Someone recently asked me about what stamp dies would be the best for someone starting out with early Anglian/Saxon decorated pottery, so I thought I’d put a post together with some information on that. Although the decorated pots from Anglian and Saxon Britain from around 450 to 650 CE have an incredible range of different stamp motifs, there are several that are incredibly common and not especially complex to carve using antler tips (my hunch is that they are common precisely because they are among the easiest to make). So with a set of six or seven of these, you can actually have a set of stamp dies that will let you replicate the decoration on many, many museum examples.
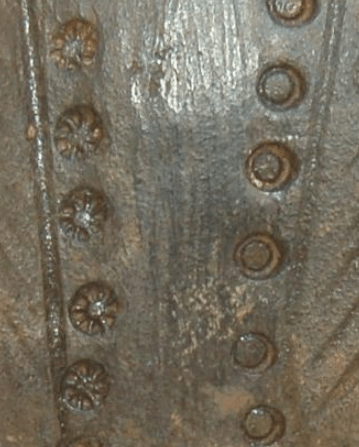
- Ring
- Circle-cross
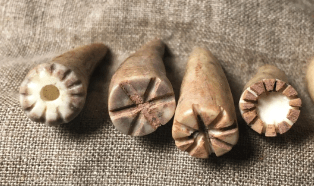
- Rosette (six or eight cuts)
- Hollow rosette
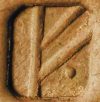
- Latticed circle, square, and/or triangle
- Notched cross
Assuming most people don’t already have an early medieval bone- and antler-worker’s toolkit, this is aimed at how to make these dies using commonplace modern tools. To make all but one of the dies listed below, the only tools you need are a drill and a handsaw (a coping saw or hacksaw works best, but anything with fairly small/fine teeth will work). A fine file or some 220 grit sandpaper is also helpful. The last example, the notched cross, is much easier to make with the aid of a triangular file, but can also be done with a knife or saw, depending on your dexterity, experience, and comfort level.
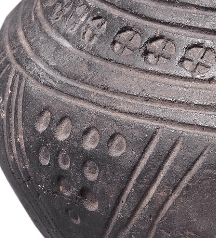
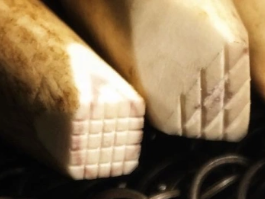
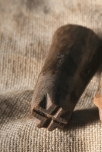
The images below show examples of these common motifs on pots. Clicking on the links in most of the captions will take you to their online catalog record in the collection of the British Museum (two are in other collections, noted in the caption).


https://www.britishmuseum.org/collection/object/H_1875-0310-14


Fabrication instructions
I have listed them in order of complexity, so they each build on the skills of the previous one. I typically use elk or deer antler tips and make my dies using sections that are anywhere from 4 to 6 cm in length, with the carved face on the narrower end. To read more about why, or to see more in-depth information on materials, tools, and historical examples, you can read this much longer post.
Don’t worry about making things too precise or symmetrical or regular. If you look closely at the images above, you’ll see that things aren’t perfectly round or consistently spaced.
Ring
Cut the antler tip so that the narrow end is sliced off at the diameter you want (I suggest somewhere in the 7-8mm range). Select a drill bit that is about 2-3mm narrower than your die’s face. Center your drill bit (you can use an awl to make a mark that will help seat the bit) and drill just a few millimeters, it doesn’t need to be more than 3 or 4mm at the most.

Circle-cross
Cut a flat face about 8mm in diameter and use your saw to make two perpendicular cuts about 3mm deep. If your saw is fairly fine, you may want to widen these cuts by folding some sandpaper double and sanding inside the groove.
Rosette (six or eight notches)
These can be anywhere from 8 to 12mm across and may have six or eight notches radiating from the center. To make an eight-notched rosette, just follow the same general process as the circle-cross, then make two additional saw cuts at a 45-degree angle to your first two. To make a six-notched rosette, you’ll make three cuts, rotating the angle each time. If you are into precision, you can always sketch your lines in pencil first to work out the spacing, but the originals are not always perfectly spaced at 60-degree intervals. Again, like the circle cross you can sand or file to widen these grooves.
Hollow rosette
Follow the same general process for the ring stamp, and make the face of the die anywhere from 8 to 12mm across. The central hole can be smaller in proportion to the size of the die, at least 4mm smaller than the total diameter of the face. Drill that first, then take your saw and work your way around the remaining ring cutting notches every two millimeters or so.
Latticed circle, square, and/or triangle
All three of these motifs are pretty common and the technique is essentially the same. For the circle, you’ll want a die face at least 7mm across but depending on how wide a cut your saw makes, you could go up to at least 10mm diameter (some are even bigger). This one is just like making the circle-cross, but you’ll cut two pairs of lines instead of just one in each direction (or three pairs if you have a fine saw, a large die face, or both).

If you want to make a square or triangle version, use the saw, a file, or a knife to shape the tip of the die to whichever shape you want. I suggest sizing them so that each straight edge measures about 1omm. For the lattice, I recommend spacing your sawed lines about 2mm apart. Square ones have the saw cuts made parallel to the sides, and for triangular ones, do one set of cuts parallel to one of the three sides and the second set of cuts is parallel to a second side. It will make a diamond lattice rather than a square grid.
Notched cross
Make a circle-cross die with a face that is between 7 and 10mm in diameter. Use a pencil or a knife to gently mark the rim of the die midway between each of the long cuts and hold your triangular file at a 45-degree angle to the vertical axis of the antler tip. Working your way in from the edge, file notches into the “pie wedge” left by your saw cuts until it looks more like a plus-sign than a circle. If you prefer to saw these notches (assuming you have a fine coping saw or jewelers saw) or carve them with a knife, that will work as well.
Once you’ve made one of each of these, try playing around with making the same ones in slightly different sizes or proportions. The dimensions I’ve given will put you within the general range of the examples I have seen, but no two dies are perfectly alike. Having several variations on each theme will give you more practice at making the dies, but will also mean you have a larger arsenal of tools ready to go if you run across a particular pot you’d like to replicate. Feel free to get in touch using the contact link below if you have further questions, and happy toolmaking!
