
I made some pants last week and someone asked me how I did it. What follows is my attempt to explain a process that involved me squatting in my underwear and looking rather foolish at times, but allowed me to make probably the best-fitting trousers I own without using any math. Why on earth would I do this? Finds of Iron Age trousers show that the garments were not perfectly symmetrical, and although it is possible to derive a well-fitting pattern by taking body measurements and doing math, Iron Age clothing makers likely relied on experience and proportion rather than numbers, and some of the historical patterns are most easily achieved by simply draping fabric on the wearer’s body. I wanted to see how that might have worked. So if you are feeling intrepid and want to make some late Iron Age trousers without modern conveniences like rulers, French curves, tape measures, or paper patterns, here is how I do it. I cannot guarantee this is how it was done in 400 CE but this method will work if you are illiterate, have no system of absolute measurement, and have nothing more than a pair of shears, a needle and thread, and six or eight pins or fish bones. The trousers fit like a second skin when seated, stretch enough to squat or crouch, and have a touch of ease when standing. There is no math involved, just draping, pinning, and a bit of basting. Having a friend on hand may be good, especially if you have limited mobility or balance issues, but I have not had any difficulty making my own trousers as a solo endeavor, even though my flexibility and proprioception are not extraordinary.
IMPORTANT:
Firstly: This is not a recipe, nor is it a pattern; it’s a rather irreverently-narrated explanation of a process. Ultimately you’ll have to figure out exactly what works best on your specific body, but I’ve noted certain considerations where they would be relevant. BUT if you have never made a pair of pants before, this is probably not the ideal place to start. Working from an established pattern will give you a better foundational understanding of how pants work before you try to make a pair this way. Human bodies are really weirdly shaped and translating flat fabric to a 3D form is not necessarily intuitive on the first try.
Secondly: This writeup also assumes you have sewed a garment before and have a basic understanding of clothing construction and concepts like seam allowances, fabric grain, and bias. I don’t provide instructions for stitching or finishing seams or any detailed assembly, just things like “sew these bits together starting from the top edge” or “attach a waistband.” There are several different stitch types and seam treatments that are known from late antiquity and the early middle ages, and I will leave that up to you (this article shows some stitches from a roughly contemporary pair of trousers from Datgen that could be used). I recommend using a seam finishing method that minimizes the bulk of the fabric, especially in the crotch junction, however.
Thirdly: These pants are form-fitting and high-waisted, so they will not fit you like your modern ones do no matter what. There are some other aspects of trousers from this period that are distinctly un-modern; for example, the main leg seam goes up the back of the leg rather than the inside or outside. So it is best if you are at least passingly familiar with the original finds of the Damendorf and Thorsberg trousers.
Overview
The basic concept here is that you’ll be wrapping the various parts of the trouser around your body, pinning them in place, and essentially constructing the whole thing on yourself inside out so that you can see all the seams as you go. I recommend going through this process with muslin or a bedsheet so that you can make any mistakes there first. Once you’ve got the concept, you can repeat the process with your wool (or I suppose you could just transfer your pattern from the muslin – people 1,500 years ago probably patterned new garments using deconstructed worn out ones, so I doubt this is a wholly modern concept). A wool 2/2 or diamond twill (what the originals were made from) will be much more stretchy, though, so don’t be surprised if your first real pants are not as snug as the muslin. As you go through the following steps with the muslin, do make sure to leave yourself a very generous seam allowance to cover any needed adjustments. Because you’ll be constructing these on yourself inside out, excess allowance won’t get in the way and you can always cut it off later.
I also recommend doing this while wearing a pair of tight-fitting modern trousers or leggings with a crotch seam – the four-way seam junction right in the crotch is a useful reference point, since you’ll be draping fabric to reach that spot, and then we don’t have to talk about your perineum (or your “root chakra” or your “grundle” or whatever). Otherwise, make note of that location on your anatomy; that’s where several of your gores and gusset will converge, so get familiar. We’re gonna call it the Great Convergence for the sake of clarity.
This guide also makes repeated mention of the natural waist (where these pants should be belted at). If you are unfamiliar with this concept, this is the spot above your hipbones and below your ribcage and is probably somewhere around your navel. It is the easiest part of the abdomen to cinch a garment tightly, since there are no bones, and is usually the narrowest part on folks with a fairly lean body type. If you look at images of men in the 1940s, you’ll probably notice how high they wear their pants, and when they are shirtless, you often don’t see their bellybutton. They are wearing their pants at the natural waist. That is where these Iron Age pants belong if you intend to adhere closely to the originals. If for some reason this is not possible for you (i.e. your natural waist is not the narrowest part of your lower torso), scroll to the bottom in the “Troubleshooting and Adaptation” section for some options to make these pants work for other body types. I will be honest, I have the most experience fitting my own body and I am about the same size and shape as the original owner of the Thorsberg trousers, so if you have additional feedback on how to adapt this process to a wider range of body types, feel free to get in touch.
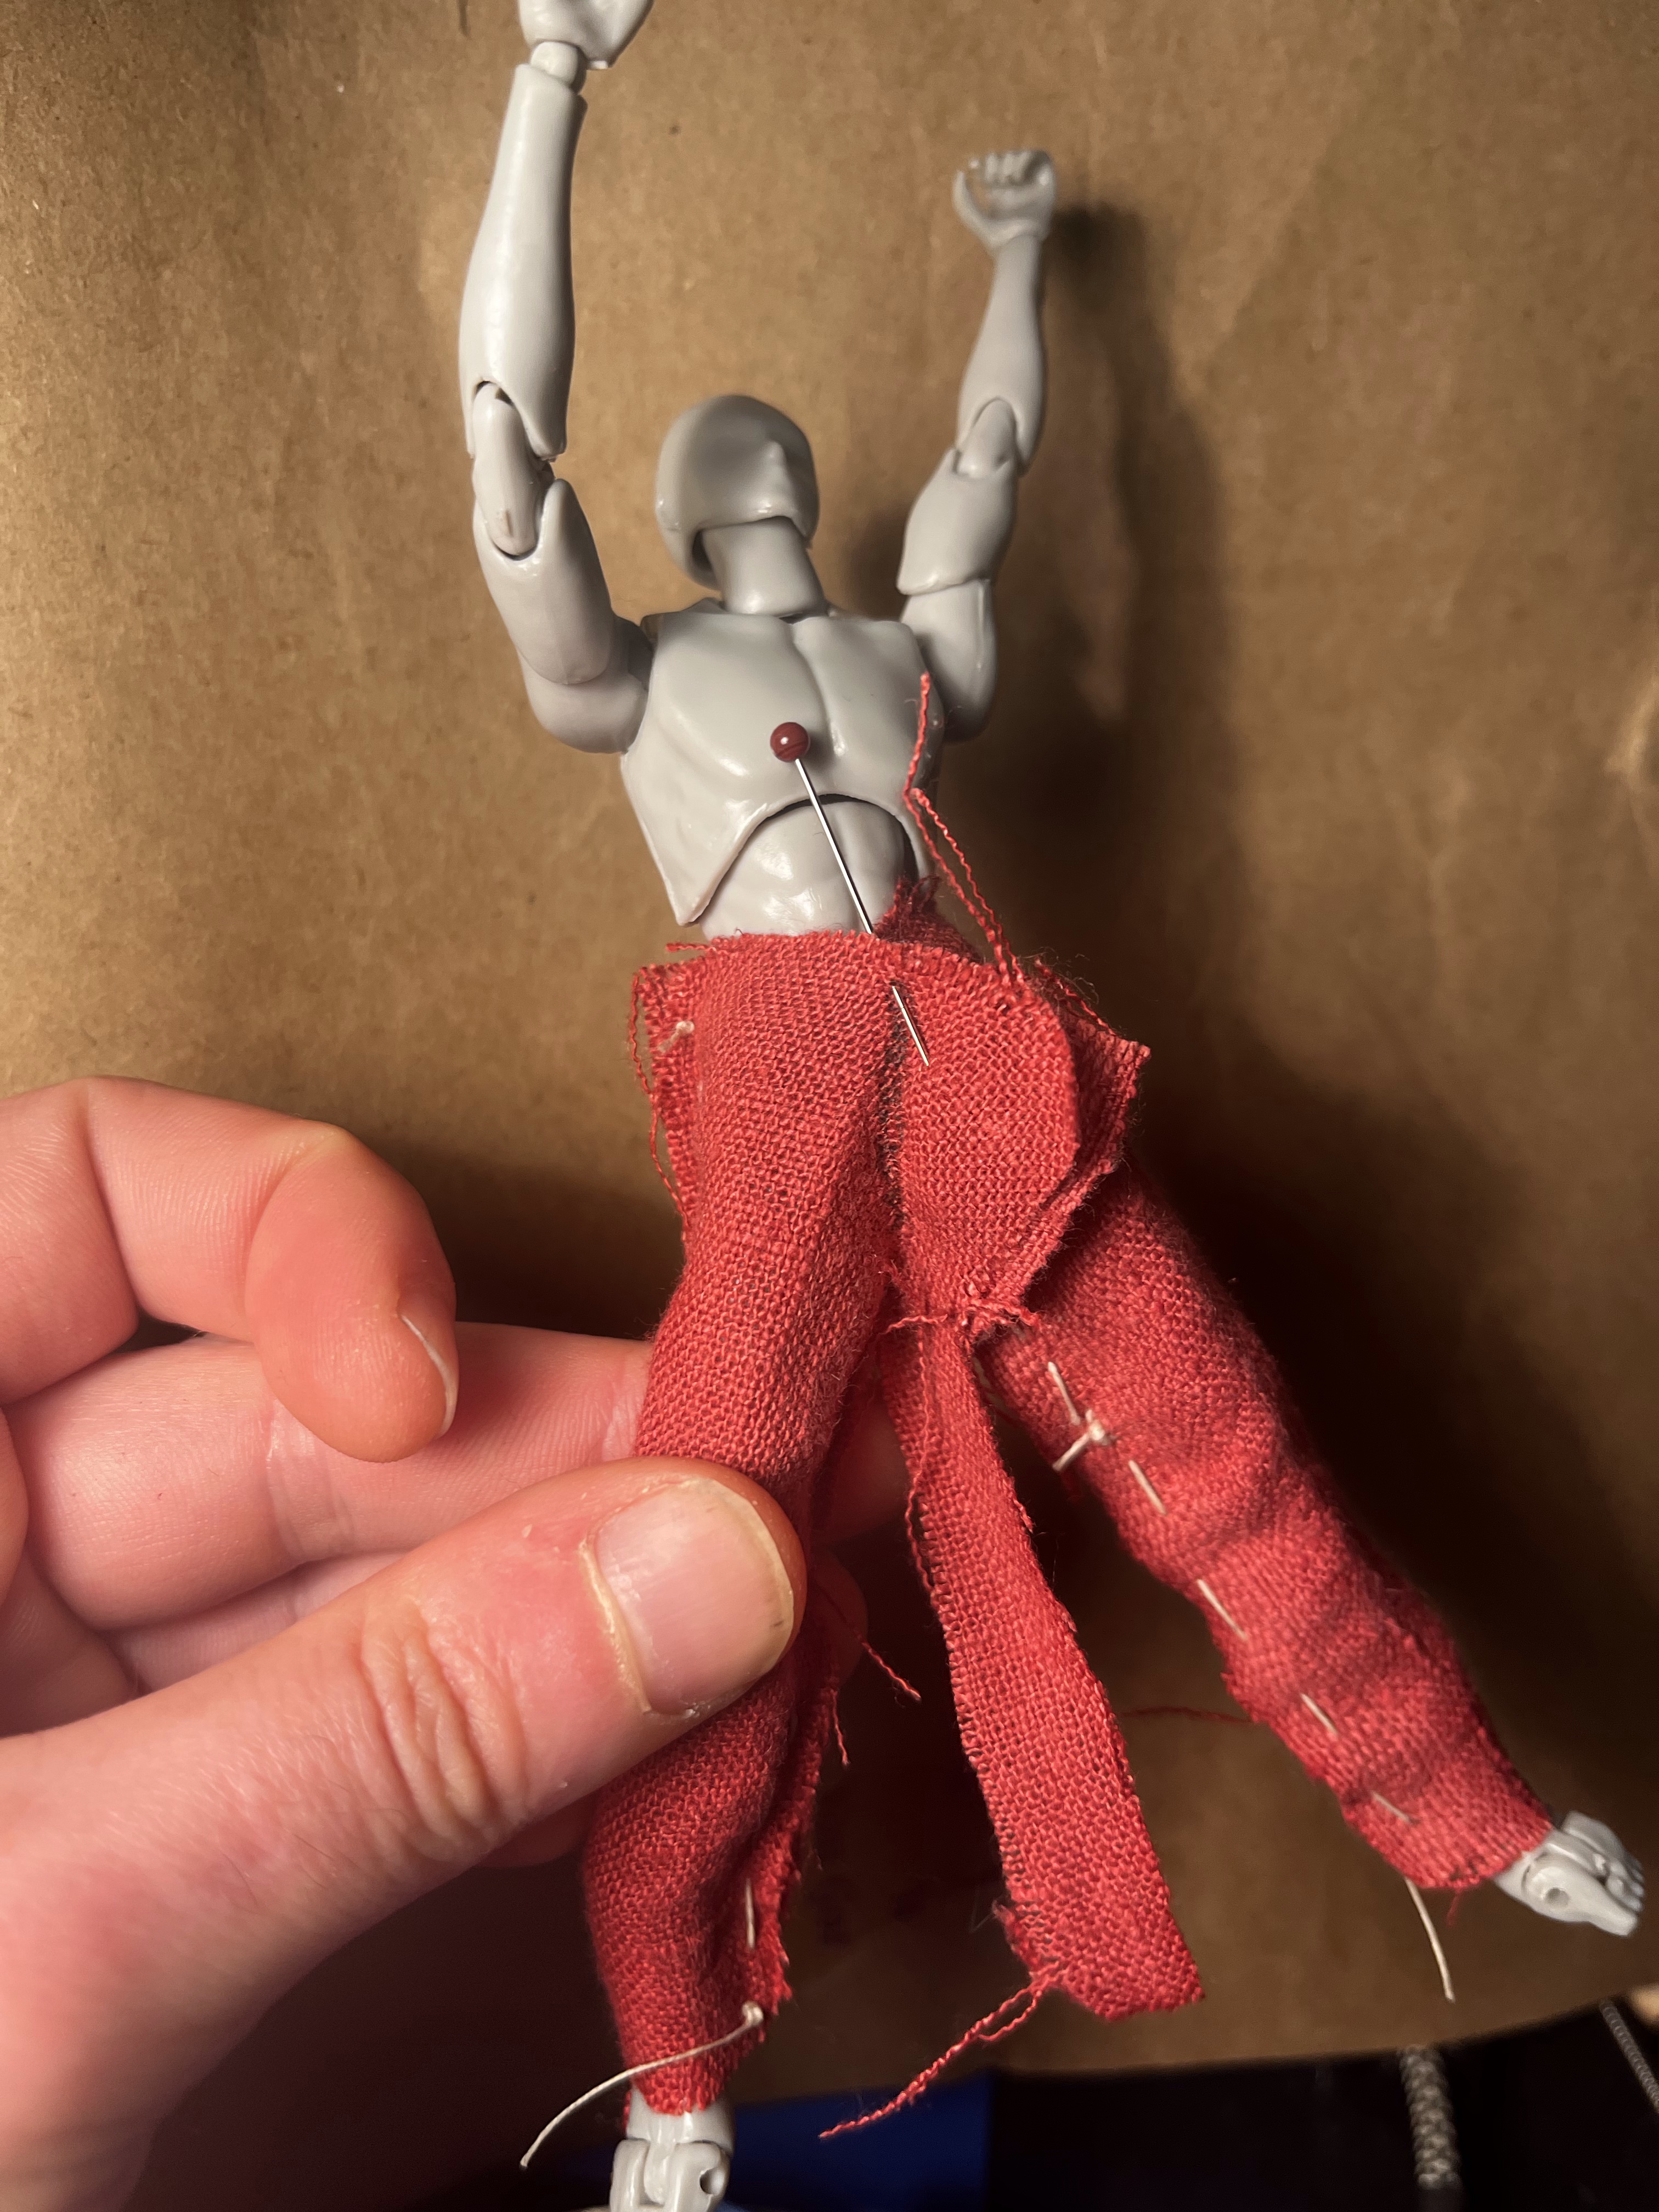
Here’s a schematic of what the trousers look like. The image on the right shows the surviving fragments on display, while my sketch on the left shows the pieces involved. The strip that forms the crotch gusset is conjectural, but the Thorsberg trousers have one just like it and textile scholar Anne Kwaspen (see p. 259-260) found that using a tapered strip here was the only way to reconstruct the Damendorf trousers in a way that actually fits a human, rather than the weird conjectural semi-circle others had hypothesized earlier (or doing without an extra piece here at all).

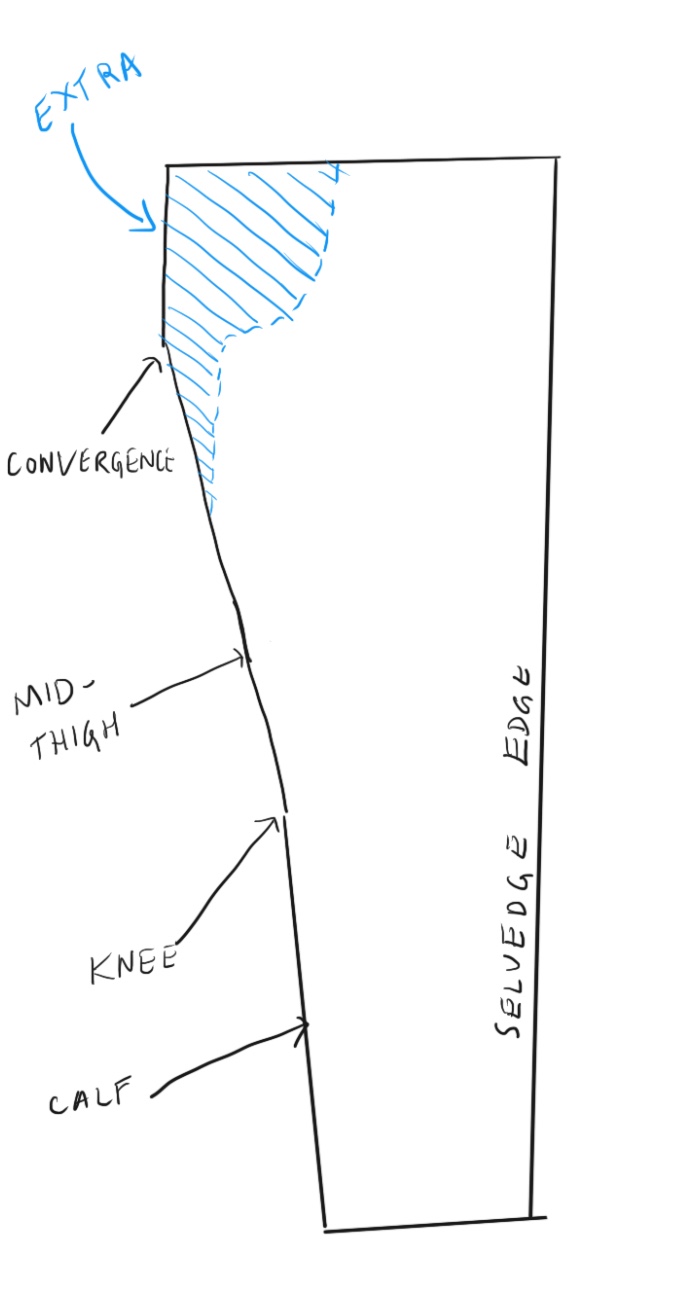
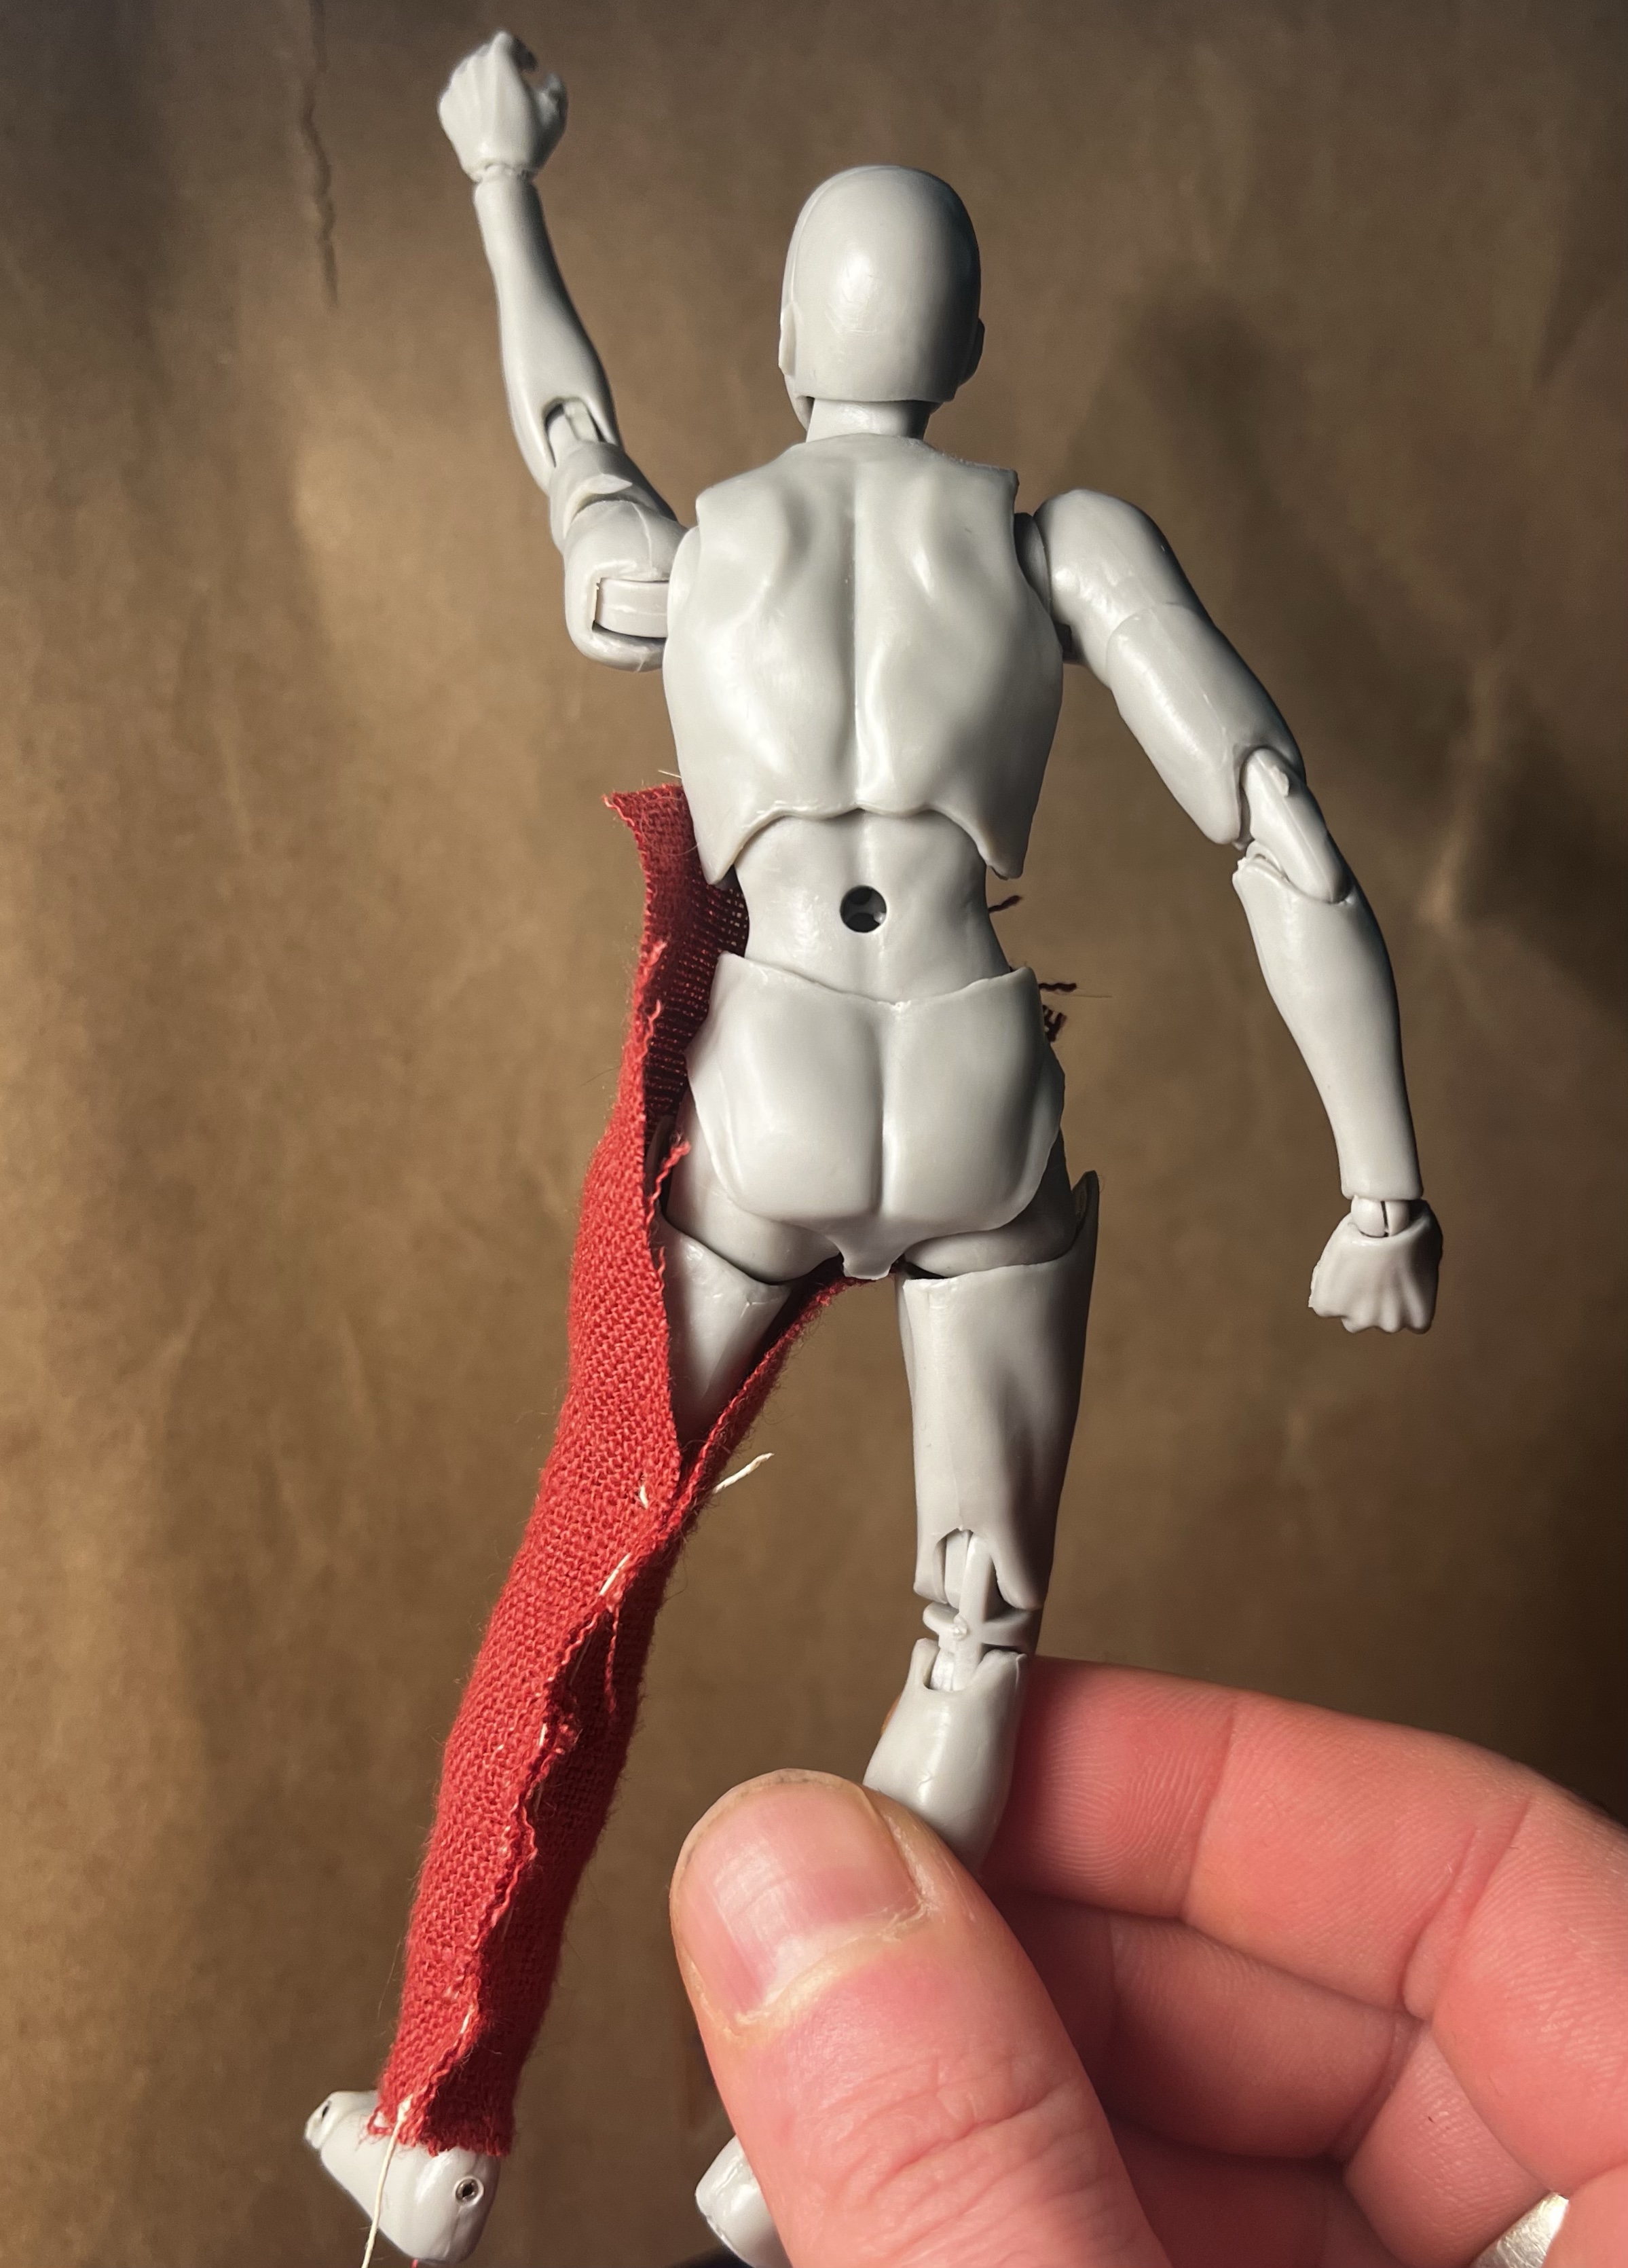
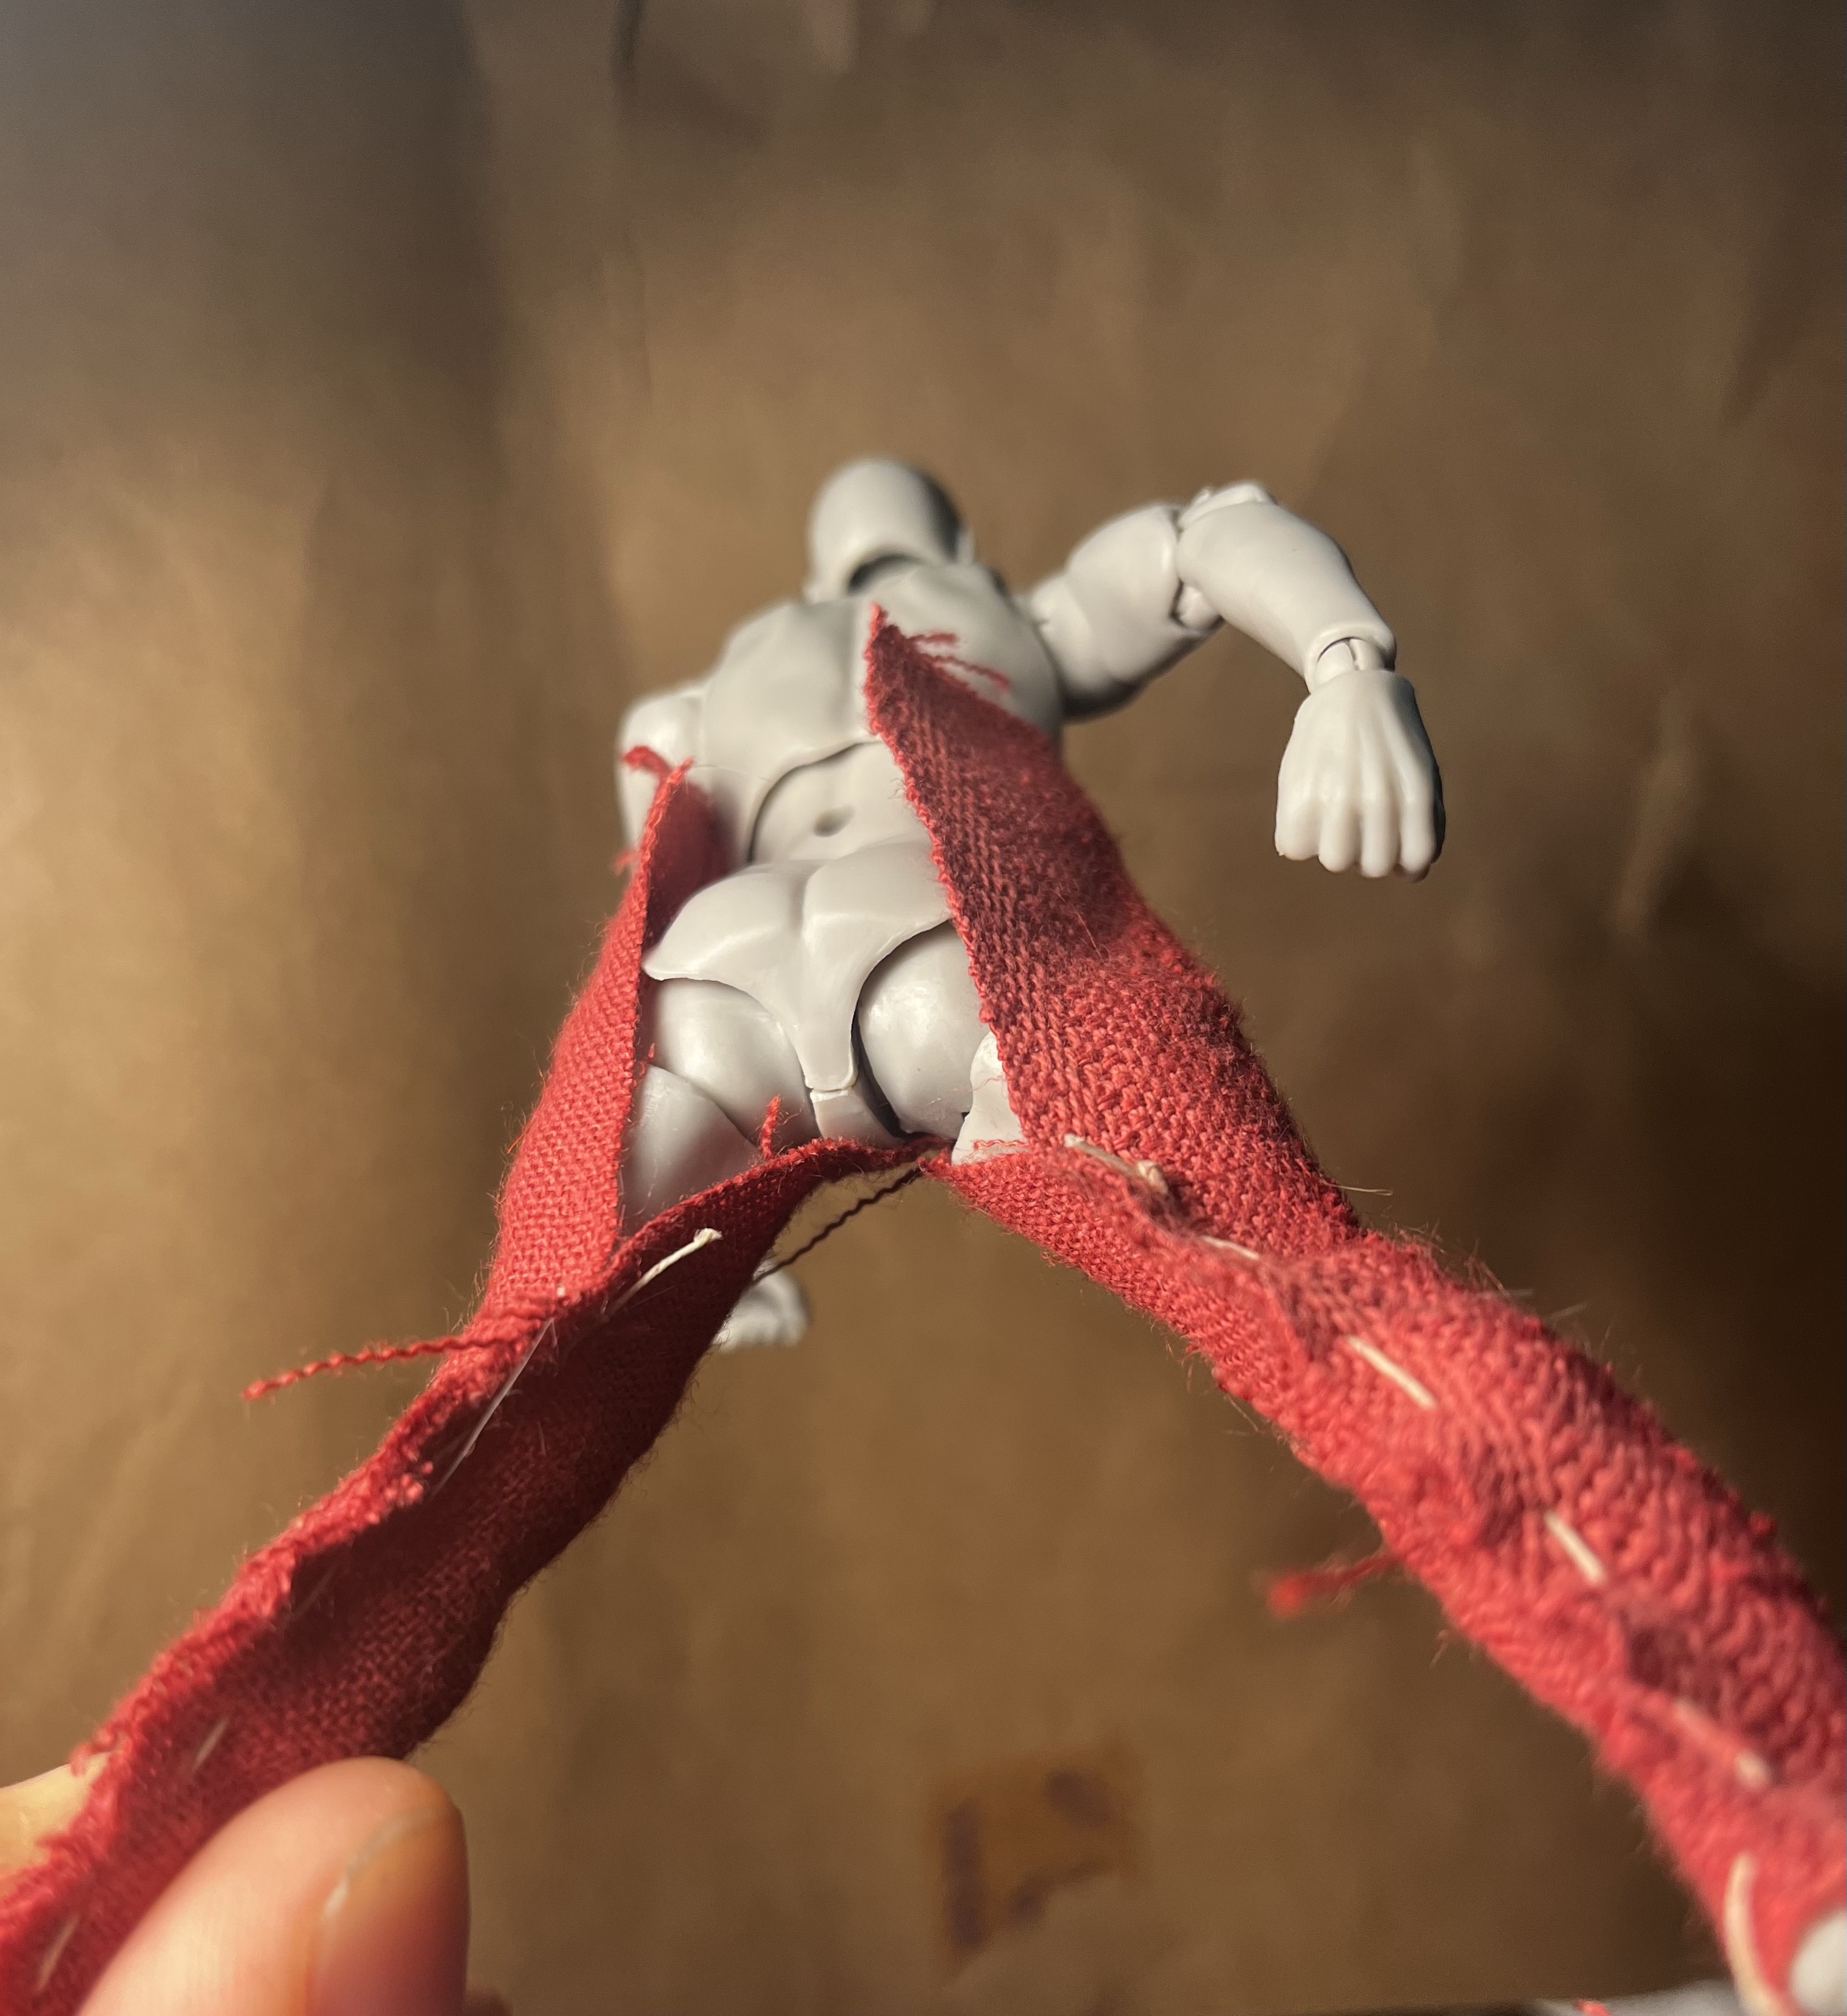
In the image above, I’ve shown the direction of the fabric grain with the arrows and labeled each piece with the terms I will use for it. The color coding corresponds to the diagrams that will follow to illustrate some of the steps. Since it is basically impossible to photograph myself in the process and also show the details, I’ve used a mixture of drawings and photos of a scale model.
Step 1: Leg tubes
Starting with a large piece of fabric that is long enough to go from your ankle to your bellybutton, drape a tube around you with a straight or selvedge edge running up the center back of the leg to a point above the natural waist. This should run up the back of your buttcheek, probably a little bit outboard of the midline of the buttock (think about the midline of the pocket of your jeans instead). This selvedge edge is meant to be a fixed line, so you want to bring the opposing edge of the leg tube to meet it. Holding the top edge of the fabric parallel to the floor, wrap the fabric to where it meets that selvedge edge at mid-thigh and pin this point. Flex the leg, making sure your thigh has enough room still, and pin at the knee and calf as well, keeping the selvedge straight up and down and bringing the fabric from the other side in to meet it.


Make the lower leg as tight as you want, but make sure you can still get your foot through the cuff (or plan to leave the last few inches open and use ties to close the ankle). Pulling the fabric smooth across the abdomen and upper thigh and into your crotch, mark the point that hits where the four seams in a pair of jeans would converge (Convergence on diagram below). Follow the grain of the fabric straight up from this point to the top edge (see blue arrow in photo below) and mark that line to cut along. You’ll have some extra fabric in the front (the blue hatched area in the drawing below) and that’s fine for now.

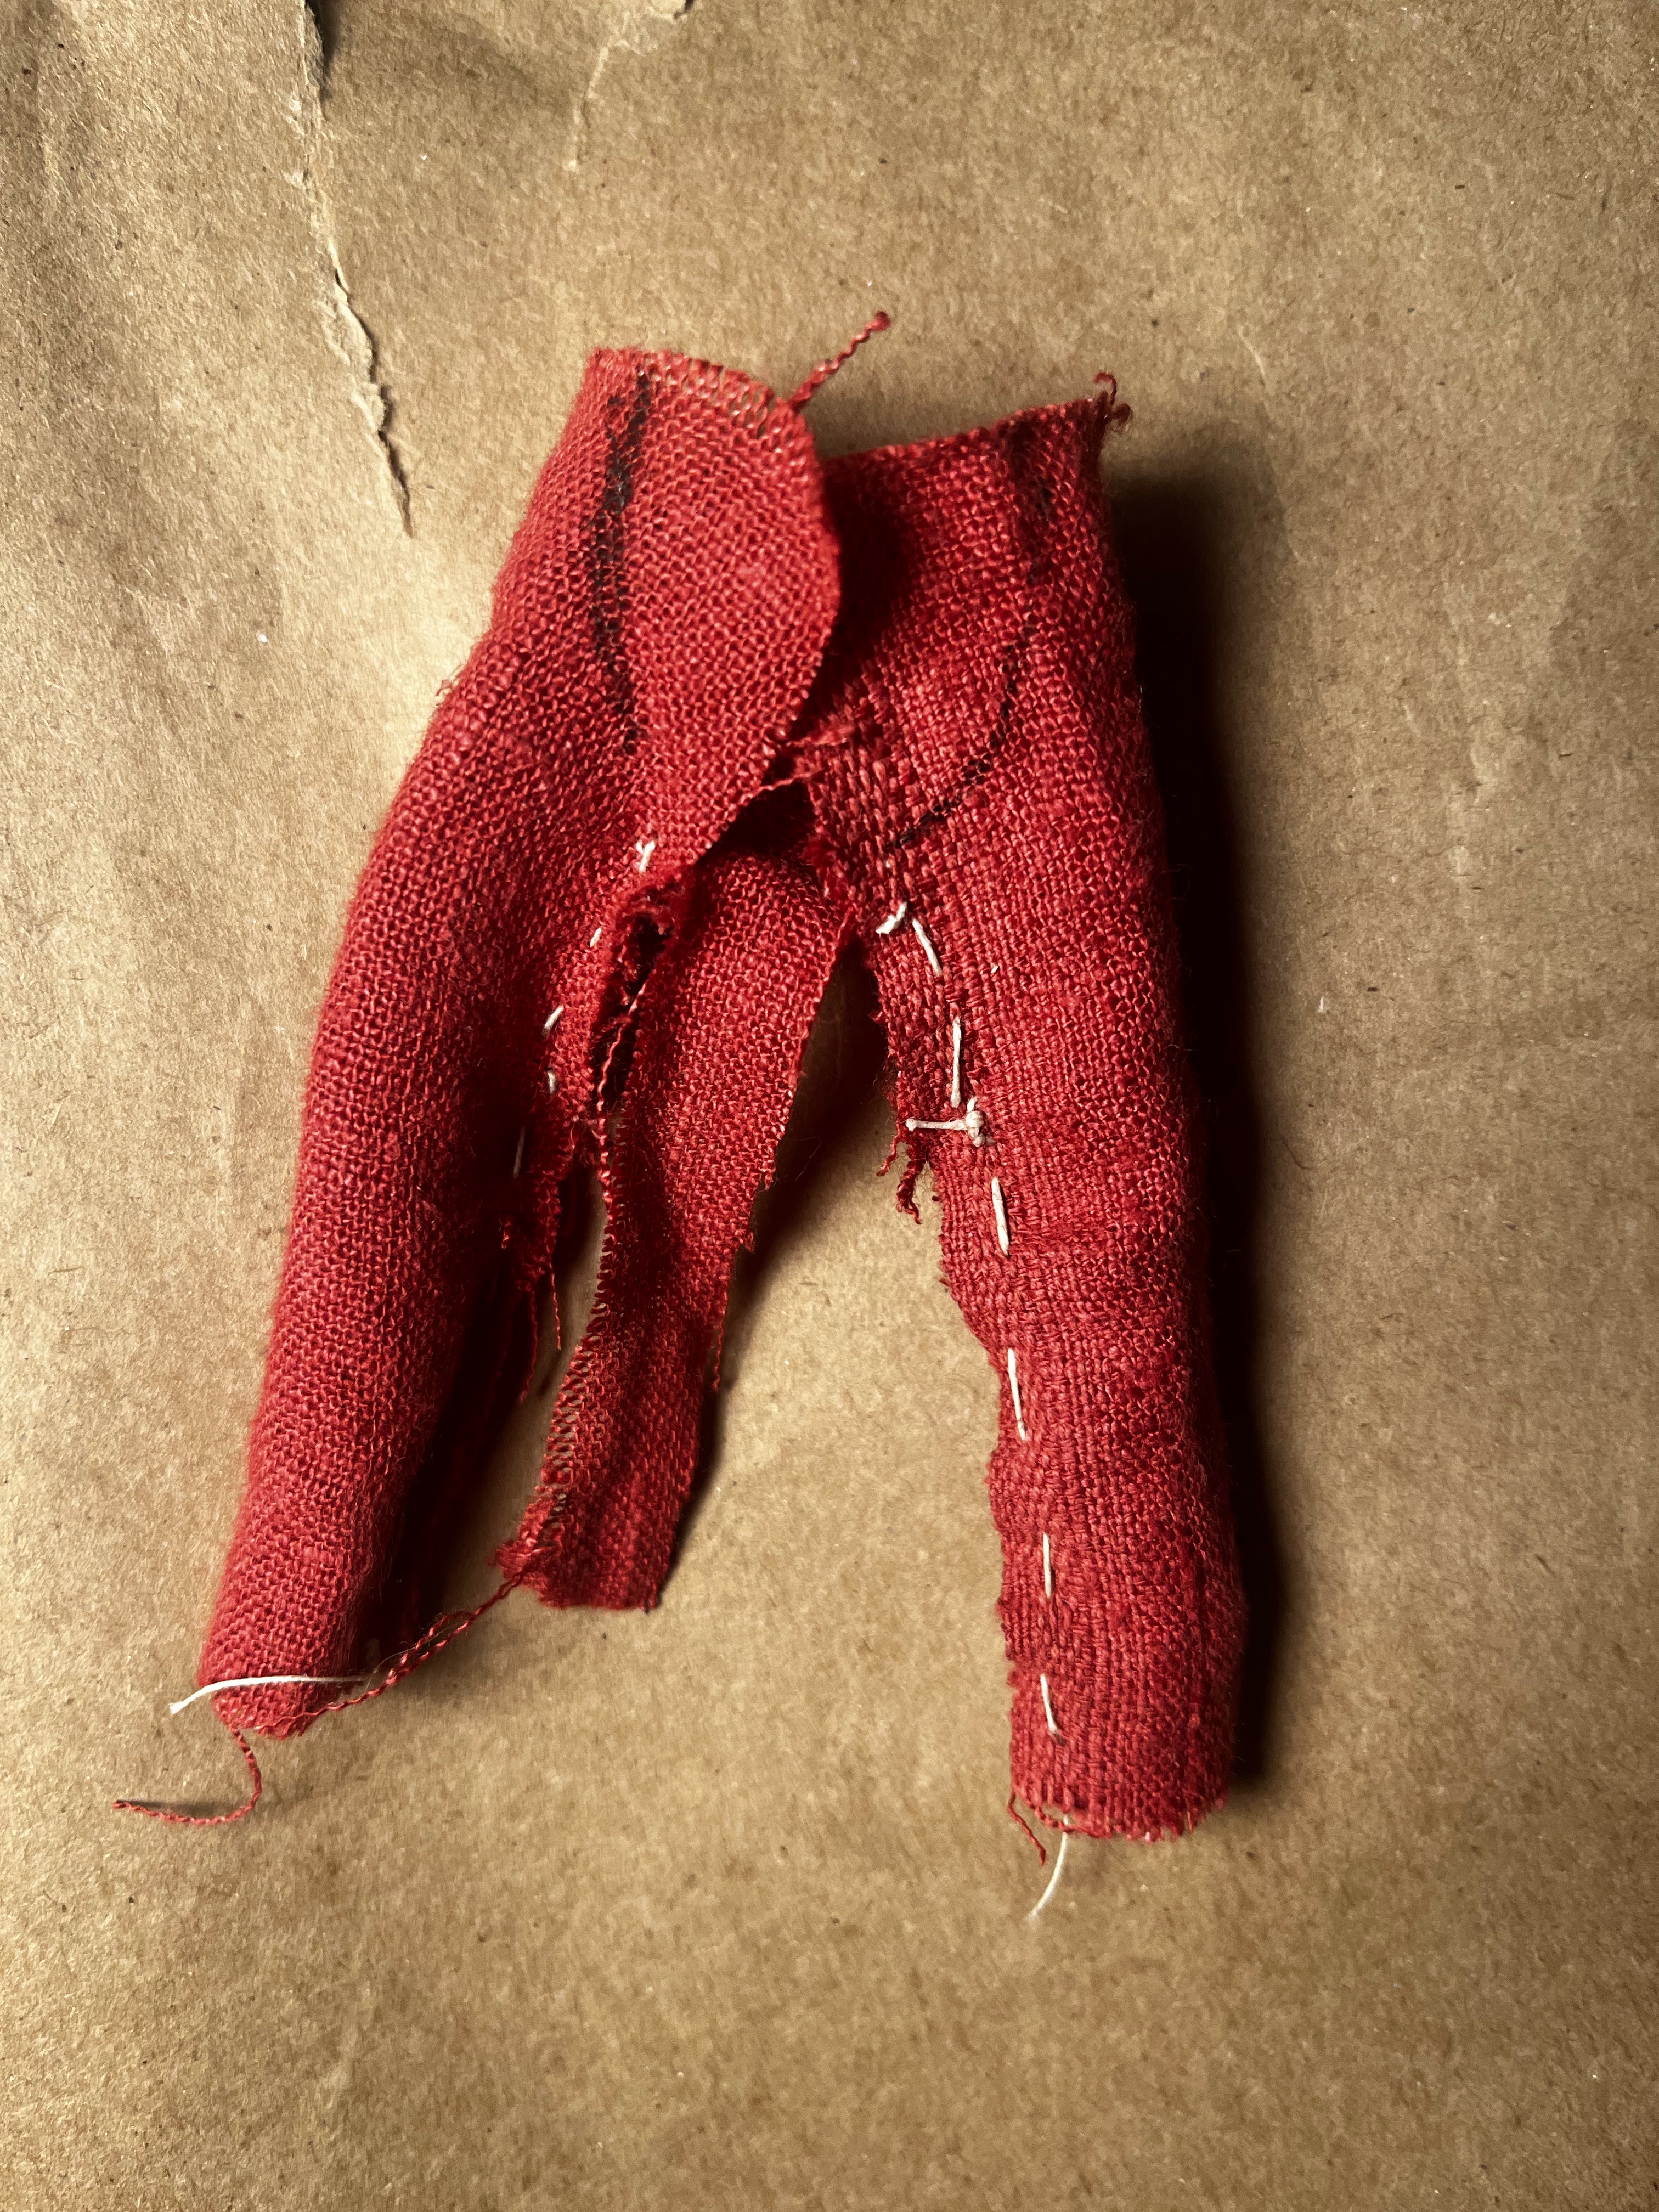
Congratulations, that’s your leg tube. Baste the seam you just pinned up the back of the leg to mid thigh. Cut it out from the piece of fabric, leaving it a little oversize just to be safe if you want. Repeat the process on the other leg. You should end up with something like this:

Step 2: Cut out Seat Panel, Thigh Gores, and Crotch Gusset
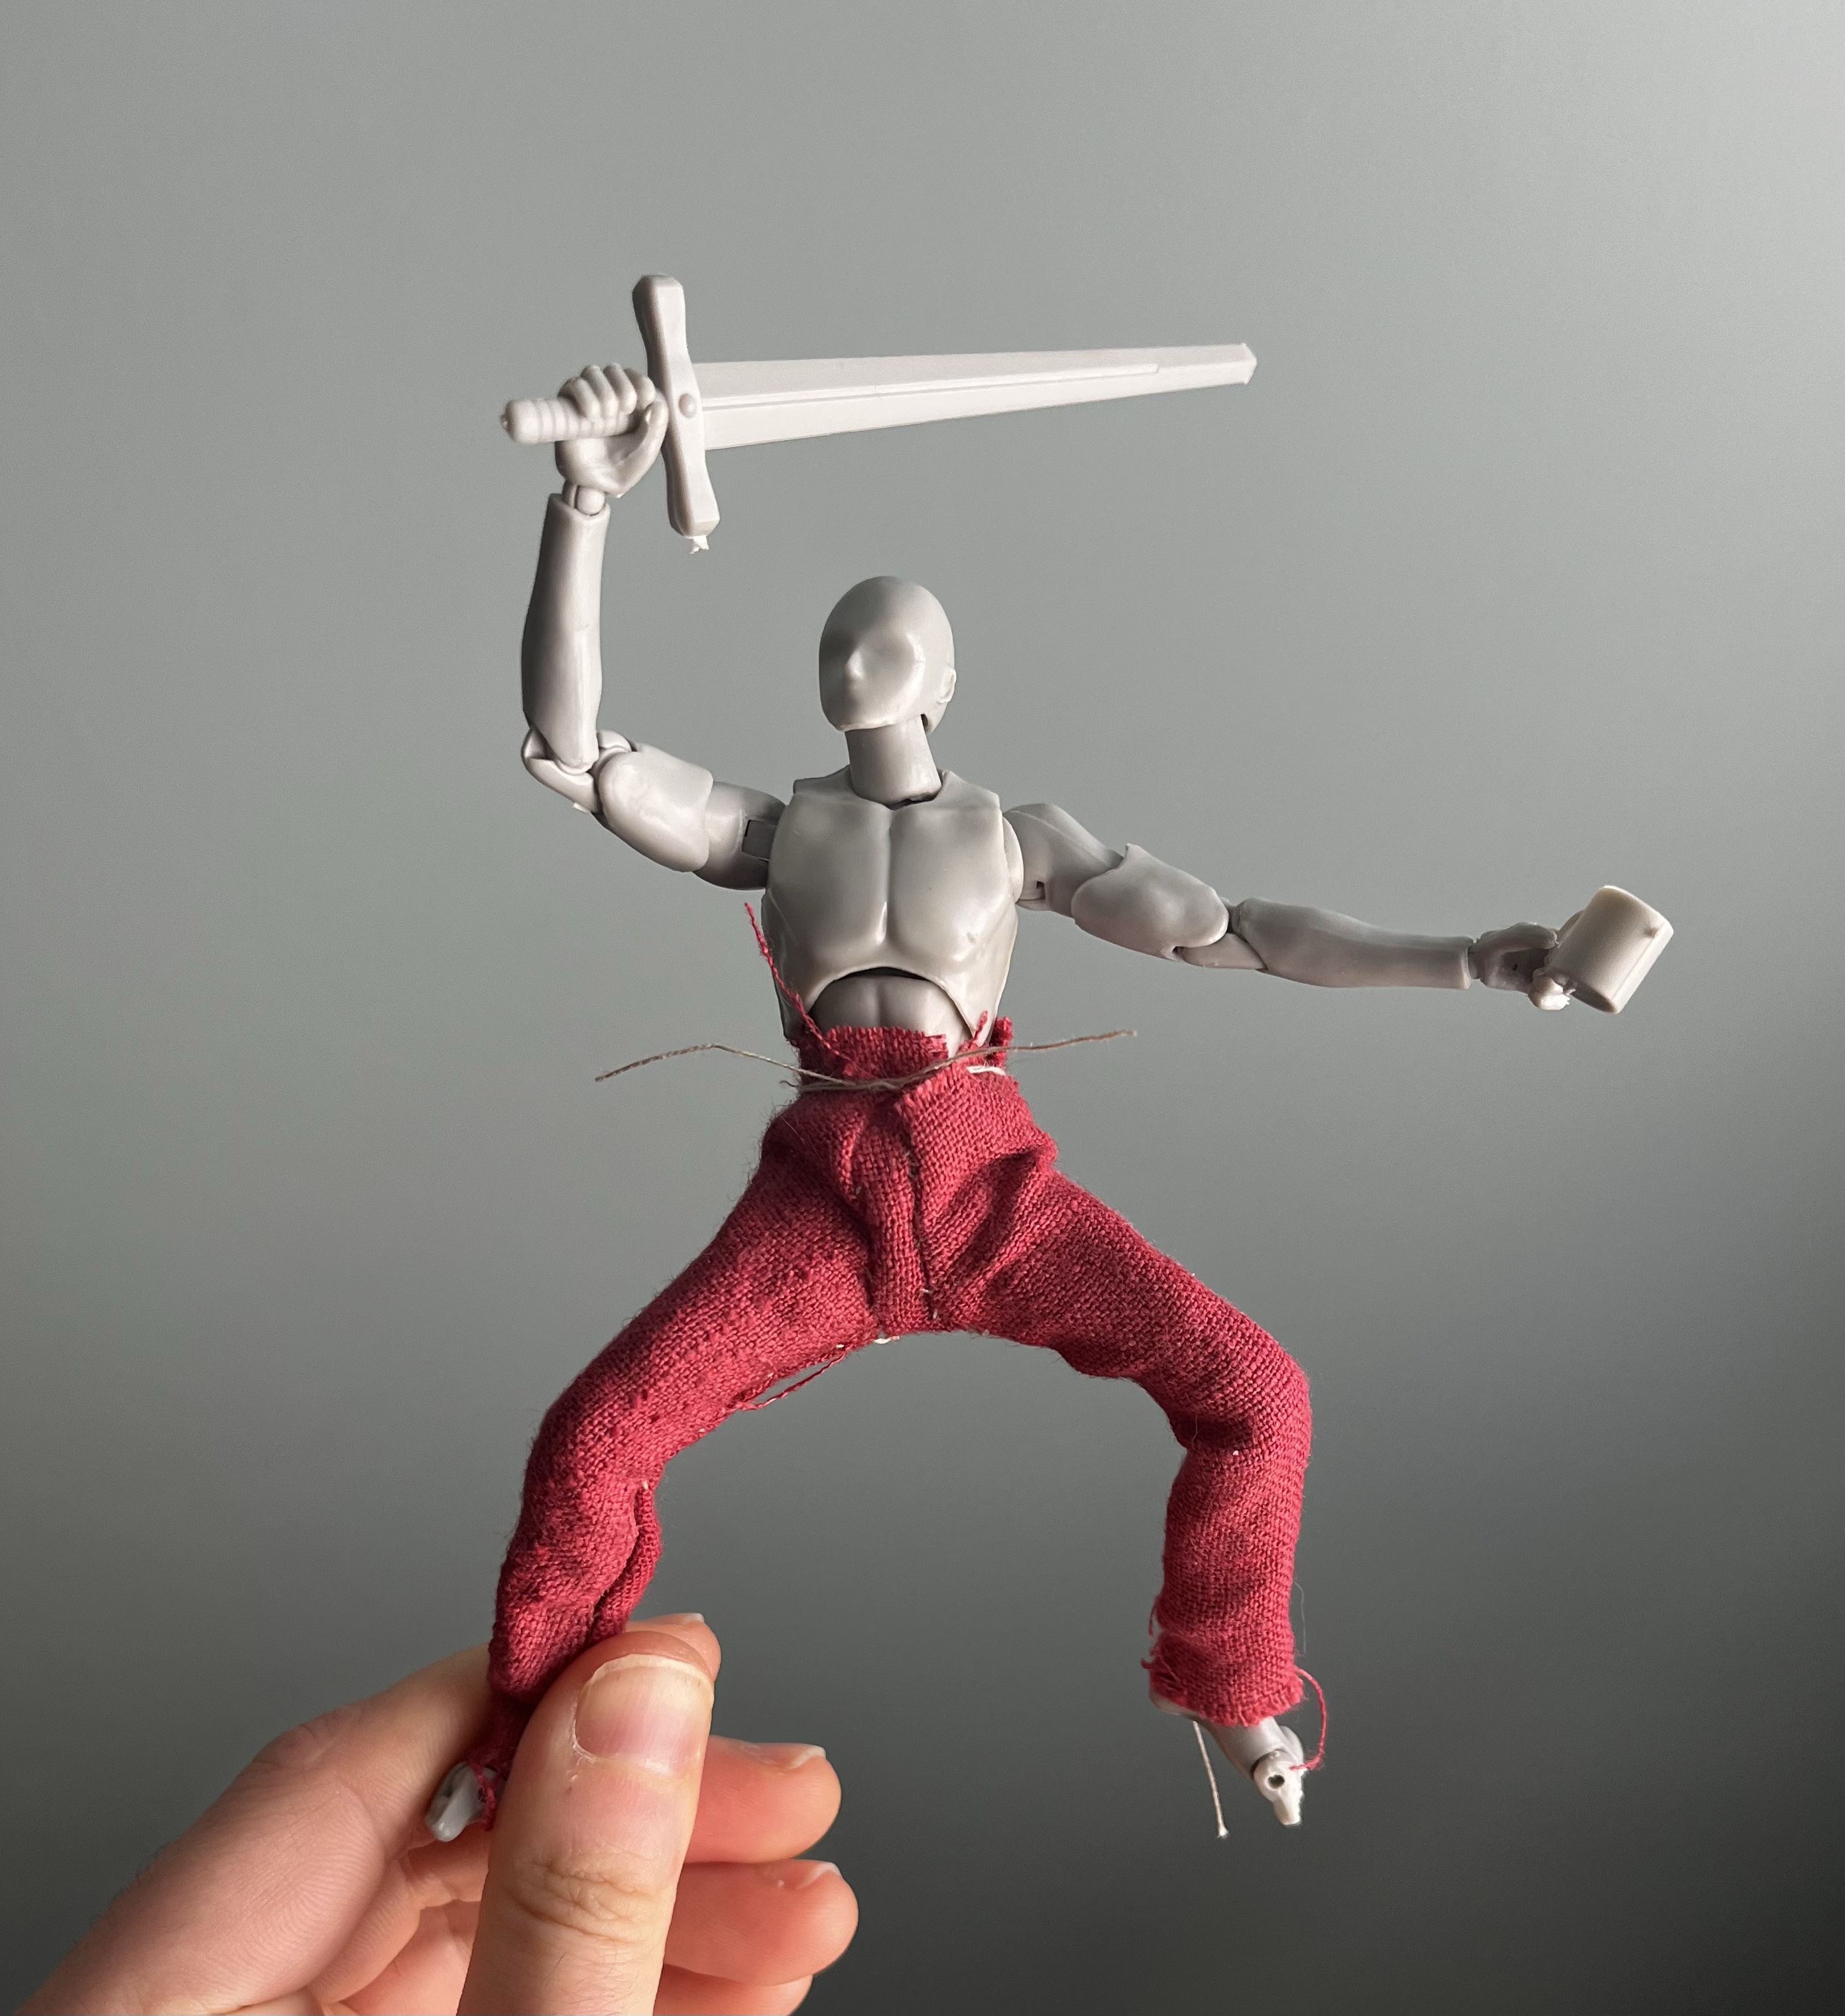
As you cut the following pieces, make sure to add in a generous seam allowance. Taking care that the upper part of your leg tubes is still more or less on that same line just outside the midline of your buttcheeks, hold some fabric up to your ass. Find the widest part of your rump and at that point, pinch or pin one edge of your fabric together with the selvedge edge of the leg tube; lay it across your behind (without stretching it) to find a rectangle that easily covers the remaining space across your ass and that is at long enough for the center of the bottom edge to reach the crotch seam junction on your jeans while the top edge is even with where the top edge of your leg tubes hits (see blue shaded area in photo below; luckily my willing model is injection molded and has a convenient seam in his plastic to mark his root chakra).


Now make two right triangles, laid out so the bias is parallel to the hypotenuse of the triangle (refer to the diagram at the beginning). The vertical edge should be a little longer than the distance from the mid-thigh mark (where you stopped the stitching on your leg tubes) to the crease under your ass cheeks. Place your hand in the middle of the bottom edge of the butt panel. The horizontal edge of each triangular gore should start at the outer corner of the butt panel and should overlap your hand that’s on the midpoint of the butt panel. The hypotenuse of that gore is whatever it is. Yay no math. Cut a strip about a handspan wide and more than long enough to go from the center of the butt panel under your junk and up to the height of the leg tubes in the front (leave this at least a handspan longer if in doubt).
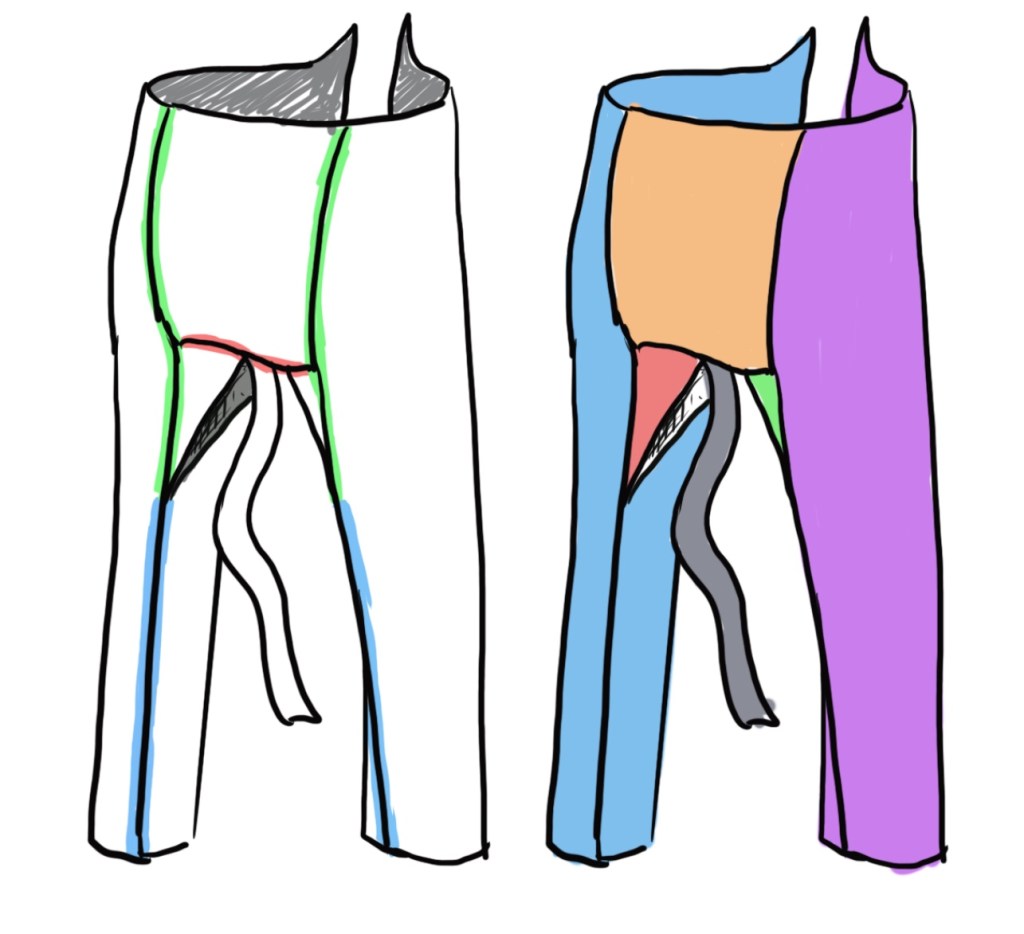
Step 3: Assemble the Seat
Join the lower edge of the butt panel to the short sides of the triangular gores and to one end of the crotch gusset strip (red seam in diagram below). Sew the back seam all the way down, starting at the top edge and continuing along the side of the butt panel and the long side of the thigh gore down to the tip (green seam in diagram below). The blue seam in the diagram below is what you had already sewn up in Step 1. If you need to baste the rest of that leg seam a little higher, do that now, or unpick a bit if you basted it too far, but your full-height vertical seam should be sewn all the way down now.
Step 4: Complete the Thighs
With everything inside out, step into the legs and wrap the front around you. While squatting, pull the front of the leg tube around to your inner thigh and pin it to where it meets the hypotenuse of your triangular gores – you should have a little extra fabric here in the leg tube, so don’t be surprised if you have up to two inches of allowance. Just take up any excess material from the leg tubes – you don’t want to shrink the thigh gores at all. Make sure you can squat with your knees as far apart as your range of movement typically allows as you are pinning this, and you’ll want to pin starting from the bottom (tip of the triangle) and working your way up. When you get to the seam between the butt panel and the gore, stop. That point will be the base of the curve you will now create up the front of the leg tube to the top of the waistband. Repeat the process with the other leg. The drawing below may look a little confusing, because at this point all the various pieces are curving with the body and not all flat and tidy anymore. Trust me, though, it is not actually this complicated – the hypotenuse of the thigh gore is the only one of the three sides that isn’t already sewn to anything.

Step 5: Find and Cut the Front Curves
At this point, your crotch gusset strip will be dangling like a weird sad tail and you will have a bunch of excess fabric in the front. You’ll need to create a curve here. The base of the curve should run nearly horizontal from the junction with the triangular gore out past your inner thigh, and should be transitioning to vertical by the time it is about even with the pubic bone.

This bit is not an exact science, but one way to guesstimate it is to stand with your feet slightly more than shoulder-width apart and pin the two leg fronts together down the midline of your abdomen most of the way down to the crotch junction. Depending on your waist-to-hip ratio, you may want to start this pinned line from the widest part of your seat instead and just work downward. Then you can go straight up the fabric grain from that widest part of your seat; this ensures you will actually be able to pull the trousers on, since the waistband needs to fit over the widest part of your seat (even if it’s a snug fit).


If you can easily squat with your knees fairly close together with this bit pinned down the front, you’re probably good to go. Actually sewing this pinned line as the front seam would not give you enough range of motion, but adding in a three- or four-inch strip for the central gusset probably will. To make it easier, you can chalk in the locations of your pins and connect the dots in a sweeping curve. Now try basting both edges of your long strip to the curve you’ve drawn. If it passes the squat test with your knees as far apart as you can get them, congratulations, you’re done with the hardest bit. If it fails the squat test, undo your basting and try again, this time by crouching with your knees apart and pulling the leg tube front in to meet the edge of the crotch gusset strip, working your way up from the Great Convergence. This is honestly an easier and more accurate way for me, but it is trickier if you have difficulty squatting for more than fifteen seconds. As you’re doing this, make sure the trousers are hitched up close to your body.

Step 6: Shape the Waist
To add just a touch of shaping to the waist, let the pants slide down to the widest part of your seat while standing and see how much you could take in and still be able to squirm into them (this is basically the difference between your butt’s circumference while crouching vs. while standing and this is different for everyone. If you only have a little excess, taper the uppermost six inches of the center gusset. If you have a lot of excess, distribute it so that you taper the center gusset and the seat panel (which would become slightly trapezoidal rather than square). For reference, I have about a 3-inch difference between “squatting ass” and “standing ass” circumference, so I just taper the center gusset in front. Either way, some taper to that center gusset is good, and you will likely have noticed that this helps to curve the waist opening so that it is lower in front than the back. That’s what you want, since the distance from your nether regions to your natural waist is always greater in the back than in the front, plus the act of crouching shortens your front and lengthens your back. Having a difference in the front and rear rise prevents plumber’s crack and we know how important that is.
Step 7: Add a Waistband
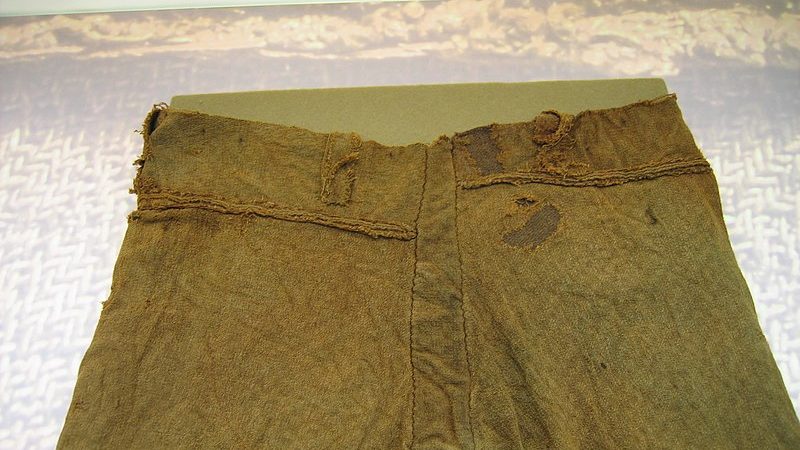
Speaking of the waistband and top edge, your trouser pattern should now have a top edge that reaches your natural waist (if it goes above, that’s fine too). When worn, you’ll have some sort of belt right at that point, and the wide waistbands on the Damendorf and Thorsberg trousers may have been folded down over a belt (the waistband seam on the Thorsberg trousers is “wrong side out,” so it may have been meant to be the underside – see image below). I place that seam right at my natural waist so that the waistband folds over to cover the belt or tie. The shirtless Germanii on Trajan’s Column don’t wear pants that do this, but their trousers appear to be more similar to the Marx-Etzel breeches (likely from around the same time) rather than the Damendorf and Thorsberg examples that are probably a few hundred years later.
The waistband itself is just a wide strip (my handspan – I know I said no math, but about three or four inches plus allowances works well in my experience) that matches the circumference at the top edge of the trousers. I start with the trousers on and belted and find the point where the fabric would fold over the belt. I pin the waistband to this edge and stitch it all the way around, then remove any excess fabric from the leg tubes or ass panel. If you’ve left the crotch gusset long, you can have it go up the middle of the waistband like on the Thorsberg trousers – this may help distribute stress across two seams rather than one, and can provide a little extra give when putting on the pants.
Also, the originals are not perfectly symmetrical, and the visible unevenness of the waistband width on both the Damendorf and Thorsberg examples seems to be a corrective for the top edge of each leg hitting at different heights if the ass junction is assembled first and the thigh widths aren’t identical. So don’t freak out if your pants aren’t perfectly symmetrical either.
Hopefully at this point, you have something that looks vaguely like pants.

Troubleshooting and Adaptation
Why is my butt so saggy?
As grandma said, you need to pull up your pants. Most of the saggy-drawers reenactors I have seen are folks who are not belting their trousers at the natural waist. If you model your pants on the originals (which have a long rise) but don’t wear them at the same height the originals’ owners did, your pants sag and it’s going to look baggy. The placement of the horizontal seat seam is not arbitrary – that should hit around the crease of your buttcheeks when crouched. You won’t get the maximum benefit of the bias stretch in the corners of that panel if it is too low. Wearing the pants too low has the added effect of pulling the gores and crotch gussets down lower and adds a ton more stress on all the seams than if they are close to the body. Tight clothes should move with the body, and if your body is moving inside them instead, the seams won’t do the job they were meant to do.
If you want a less fitted garment, simply scaling up a pattern for a fitted one might not do what you want, so think about which direction you want to add ease in (for a looser fit, start by just increasing the center gusset width and the lower edge of the seat panel width by the same amount), and the further from your actual crotch you want the trouser crotch to live, the more these dimensions will need to change. Imagine that you are creating an isosceles triangle – your legs are the two sides, and the amount of fabric room you need at the crotch is the base of the triangle. The further from the apex of the triangle (your junk) you put the base, the wider it gets.
I can’t wear pants at my natural waist
But assuming you’re going for a snug trouser, if your body type/shape prevents you from wearing your trousers at the natural waist all the way around (if you have a prominent belly, for example), you will need to shorten the rise of your trousers either by recutting them or by folding/rolling the waistband to take up some of the extra fabric. Repatterning could take a few routes – lowering the waistband in the front by curving the top edge of the trouser more is the best way to accommodate a belly.
I have too much extra fabric at the waist
If you have a hip-to-waist ratio that leaves you with a lot of extra fabric at the waist to be able to pull on the pants, the folded waistband can help here. Instead of trying to distribute the excess fabric all the way around, try the following: belt the pants tightly and pull the extra fabric out at either side of your body. Pinch it close to your body and fold all the excess against yourself, either to the front or the back, and with it laying flat, roll the waistband over (if you were a teen in the 1990s, you know how to do this with the cuff of your jeans). This will give you one big pleat at either side and should take up the excess without adding too much bulk. This tutorial on donning Roman braccae shows a similar principle on a much more exaggerated scale – you won’t need to roll nearly this much, probably just a double-fold.

One thought on “No math Damendorf Trousers”